An android splash screen is specify a how to set starting 3 sec any JPEG or PNG image in your android application.
Many popular Android Apps such as Skype, Facebook, Adobe Reader, 500px, Dropbox etc., uses splash screen to display their logo or related an image.
--> First we will create a new default project using these simple steps:
1. Click on File > New Project.
2. Next, define Application Name and Minimum SDK and hit Next
3. Select Blank Activity and Hit Next.
4. Hit Finish.
"This creates a simple Hello world Project for which we will implement android Splash screen."
-->> Creating Android Splash Screen:
1. To display a splash screen, we need a layout first of all.- So let’s create a Layout by Right Clicking on Layout (located in App > Res > Layout) and selecting New > Layout Resource File.
- Give it any name. I gave it splash.xml.
- Now select Text tab located at bottom as shown in image below.

2. Now Open File Explorer in your Operating System and paste the image you want to use as splash screen in Drawable Folder.
- (Generally located at
C:\Users\UserName\AndroidStudioProjects\AndroidSplashScreenExample\app\src\main\
res\drawable).
- Advisable Image size is 800 x 1280 pixels and format is JPEG or PNG.
- Make sure that you named the image using small letters and underscores without using Special Symbols.
- I named it as splash_image.
3. Now type the following code in Text Tab of splash.xml:

- Background is set to splash_image we just copied in Drawable folder.
- Here layout’s width and height are set to match_parent so that the background image fills the entire Layout.
4. Splash screen is a separate activity which will be displayed first ahead of all other Activity.
- We create splash screen activity by creating a class.
- We create a new class by Selecting App > Java > Your Package Name and right Clicking on your package and selecting New > Java Class.
- Give it any name. Here, I gave it as SplashScreen.
- Now Type the Following Code in SplashScreen activity:
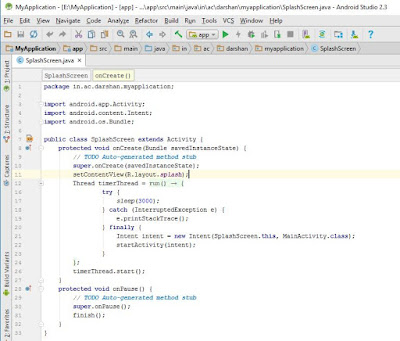
--> We use methods of Thread class such as –
sleep(long time) – to make the thread sleep for some time (in milliseconds).
start() – to start the thread.
- sleep takes the time in milliseconds as its parameter(3000 => 3 seconds).
- Here we used this delay time as the time to display the splash screen activity.
- After this delay time, MainActivity is started by the code written in finally{} block.
- The splash screen activity must not be shown when the user presses the back button.
- In order to do this, we should destroy the splash screen activity after it is shown for few seconds.
- This is done by the use of onPause() method.
- The onPause() method is a method of Activity class which comes into play when the user leaves the activity.
- Next, We need to define which activity to open after displaying Splash screen.
- This is done using the Intent(Context, Class) constructor of the Intent class.
5. Now to make your splash screen to work, you need to refer the SplashScreen Activity in Android Manifest.
- So, open the Manifest file by clicking on App > Manifests > AndroidManifest.xml.
- Now we add reference to new Activity we just created and Change the Launcher Activity (Activity which Launches first) to splash.xml by changing the code shown below:

6. Now Hit Run Button (or Shift+ F10) and select Emulator or Real Device to run the program. Now you can see Android Splash Screen displaying before your activity.